Modo Tips – Item List and Visibility Usage
These are a number of not so common tips and concepts for modo‘s item list and item selection modes that this short tutorial outlines. For more tutorials, please check out our training section in our shop.
Collapse and Fold
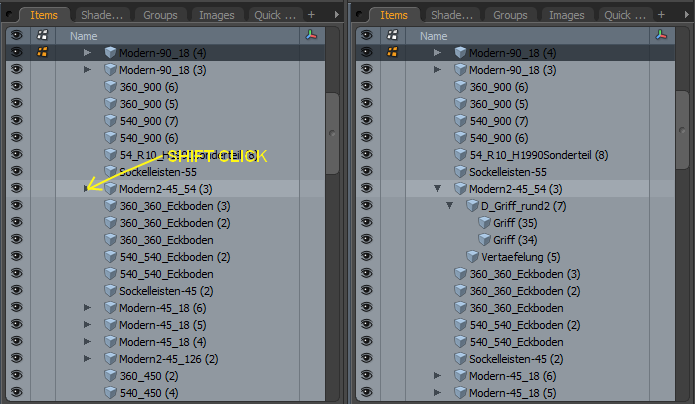
When you have a lot of items in your itemlist, you will typically have a large hierarchy and so it is very useful to be able to collapse and fold them easily. Obviously, you can simply click the drop down icons to collapse and fold each item, but more importantly, you can SHIFT CLICK any of the items and it will collapse and fold not only that item, but its entire hierarchy.

Find Items
Another useful tip for items in the itemlist is to select an item in the viewport and then hover over the itemlist with your mouse and press f on the keyboard for find. This will jump the listbox to the item you have selected so it is quick to find an item visually, instead of by the hierarchy or list manually.
Autovisibility
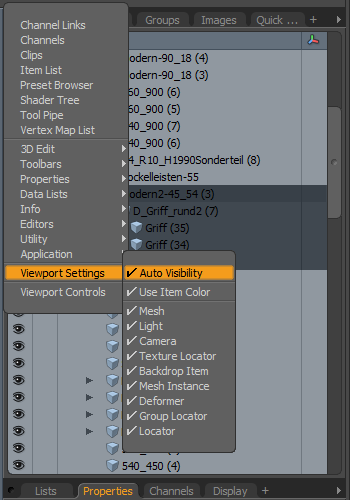
Modo’s itemlist has two main selection modes for visibility and it can easily be changed by right clicking on the items tab and then toggling the option as shown in the screenshot below.
Once you have the autovisibility activates, you can simply click any item anywhere in the list and all other items will be hidden so you only see the selected item. This is especially useful for modelling if you are working on one item at a time and don’t need to see other elements in your scene.

Hiding / Unhiding Multiple Items
With a scene of many items it can be difficult sometimes to manage the visibility of them all. This is where you will need to know how to hide and unhide items for controlling their visibility. The ‘eye’ icon sets a layer to be visible in the viewports and for rendering by default and can be applied to multiple items at once. To do this, you must first select all the layers that you want to control and then you can use the view menu items to hide and unhide or the corresponding keys, “h” and “u” which are used by default for hide and unhide. When you multi select many items and unhide them, modo will reenable visibility for each layer all at once.
Note: When you have items collapsed in the items list, they will not change their visibility automatically so you may first need to expand all items (from the tip above), then select them all and unhide them. This will make it easy for you to turn back on all your objects and is especially useful after using the auto visibility feature since it sets all other layers to be hidden.
Visibility with Groups
The other method to easily control the visibility of objects is to use groups to put all your items into a named group and then control that entire group by a single visibility setting on and off for that group. This is especially useful as it allows you to easily control your group’s visibility while working in modo and it is much easier to control the render settings as well since you can quickly activate features for the group for rendering.
The following video explains how to use the group viewport for visibility and rendering settings.
Coloring Objects
The last tip I have with items and groups is to use the color options in the group panel to easily setup the wireframe colors of your items. By doing this from the groups panel, you can set the colors of all items at once using the created groups.
